Introduction
The Guide to Cultivating and Maintaining Vanda Orchids is a comprehensive resource that provides essential information and tips for successfully growing and caring for Vanda orchids. This guide covers various aspects, including the ideal growing conditions, watering and fertilizing techniques, potting and mounting options, as well as common pests and diseases to watch out for. Whether you are a beginner or an experienced orchid enthusiast, this guide will help you cultivate and maintain healthy and vibrant Vanda orchids.
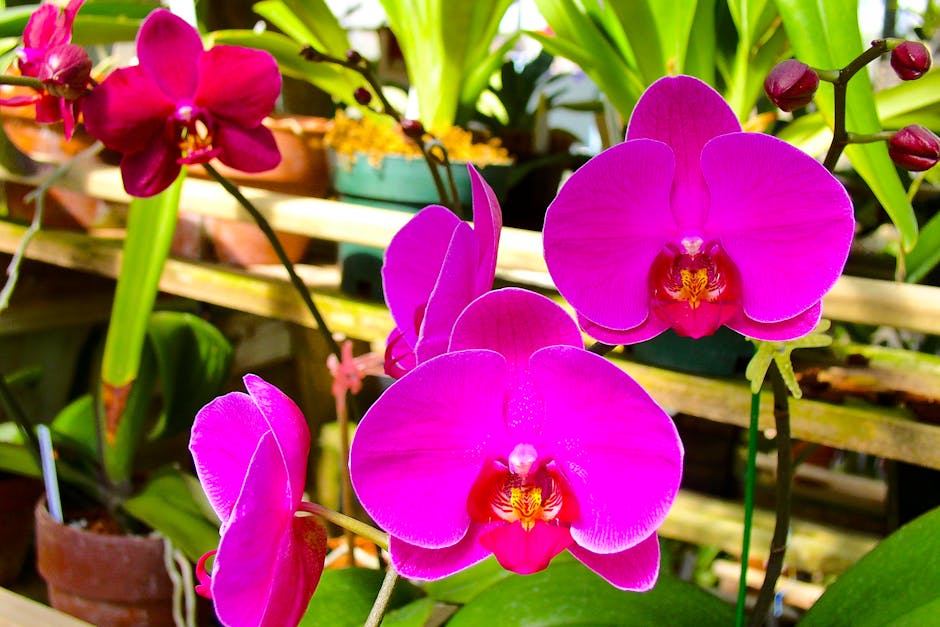
Understanding the Basics of Vanda Orchids
Vanda orchids are known for their vibrant and exotic beauty, making them a popular choice among orchid enthusiasts. If you’re new to cultivating and maintaining Vanda orchids, it’s important to understand the basics to ensure their health and longevity. In this guide, we will explore the fundamental aspects of caring for Vanda orchids, from their natural habitat to their specific needs.
Native to Southeast Asia, Vanda orchids are epiphytic plants that grow naturally in tropical climates. They are commonly found in countries like Thailand, Malaysia, and the Philippines, where they thrive in warm and humid conditions. Understanding their natural habitat is crucial in replicating these conditions when growing Vanda orchids at home.
One of the key factors in successfully cultivating Vanda orchids is providing them with the right amount of light. These orchids require bright, indirect light to thrive. Placing them near a south or east-facing window is ideal, as they can benefit from the morning or afternoon sun without being exposed to direct sunlight, which can scorch their leaves.
In addition to light, Vanda orchids also need proper air circulation. Their roots are adapted to absorb moisture from the air, so it’s important to provide good ventilation. This can be achieved by placing a small fan near the orchids or by growing them in an open-air environment, such as a greenhouse or a well-ventilated room.
Watering Vanda orchids can be a bit tricky, as they have unique watering requirements. Unlike most orchids, Vanda orchids do not grow in soil. Instead, they are typically grown in baskets or mounted on slabs of wood or cork. This allows their roots to hang freely and absorb moisture from the air. To water Vanda orchids, it’s best to soak their roots in water for about 15-20 minutes, allowing them to fully absorb the moisture. Afterward, let the roots dry out before watering again, as they should never be left sitting in water.
Fertilizing Vanda orchids is essential for their growth and blooming. These orchids have high nutrient requirements, so it’s important to provide them with a balanced orchid fertilizer. During the growing season, which typically occurs from spring to fall, fertilize your Vanda orchids every two weeks. However, during the dormant period in winter, reduce the frequency to once a month.
Another important aspect of caring for Vanda orchids is maintaining the right humidity levels. These orchids thrive in high humidity, ideally between 50% and 70%. To increase humidity, you can use a humidifier or place a tray filled with water near the orchids. Misting the leaves can also help, but be cautious not to overdo it, as excessive moisture can lead to fungal diseases.
Lastly, it’s important to keep an eye out for pests that may affect your Vanda orchids. Common pests include aphids, mealybugs, and scale insects. Regularly inspect your orchids for any signs of infestation, such as sticky residue, distorted leaves, or tiny insects. If you notice any pests, treat them immediately with an appropriate insecticide or by manually removing them with a cotton swab dipped in rubbing alcohol.
By understanding the basics of cultivating and maintaining Vanda orchids, you can create an environment that mimics their natural habitat and ensures their health and beauty. Remember to provide them with the right amount of light, air circulation, and humidity, and to water and fertilize them accordingly. With proper care, your Vanda orchids will reward you with stunning blooms and a touch of tropical elegance.
Step-by-Step Guide to Growing Vanda Orchids
Vanda orchids are known for their vibrant and exotic blooms, making them a popular choice among orchid enthusiasts. However, cultivating and maintaining these stunning plants can be a bit challenging for beginners. In this step-by-step guide, we will walk you through the process of growing Vanda orchids, from selecting the right potting medium to providing the ideal growing conditions.
First and foremost, it is crucial to choose the right potting medium for your Vanda orchids. These orchids are epiphytes, which means they naturally grow on trees rather than in soil. Therefore, a well-draining potting medium is essential to mimic their natural habitat. A mixture of coarse bark, sphagnum moss, and perlite is commonly used for Vanda orchids.
Once you have prepared the potting medium, it’s time to select a suitable pot. Vanda orchids have aerial roots that need ample space to grow and breathe. Therefore, it is recommended to use a basket or a slatted pot that allows air circulation. This will prevent the roots from rotting and promote healthy growth.
After potting your Vanda orchids, it’s important to provide them with the right amount of light. These orchids thrive in bright, indirect light. Placing them near a south or east-facing window is ideal. However, be cautious of direct sunlight, as it can scorch the leaves. If you don’t have access to sufficient natural light, you can supplement it with artificial grow lights.
In addition to light, Vanda orchids require high humidity to thrive. Misting the leaves with water or placing a tray of water near the plants can help increase humidity levels. Another effective method is to use a humidifier in the room where your orchids are located. Aim for a humidity level of around 50-70% to ensure optimal growth.
Watering is another crucial aspect of caring for Vanda orchids. These orchids prefer to dry out between waterings, so it’s important not to overwater them. A good rule of thumb is to water them thoroughly once a week and allow the potting medium to dry out before watering again. It’s also important to water the orchids in the morning to allow any excess moisture to evaporate during the day.
Fertilizing your Vanda orchids is essential for their overall health and blooming. Use a balanced orchid fertilizer, diluted to half strength, every two weeks during the growing season. During the dormant period, reduce the frequency to once a month. Be sure to flush the potting medium with plain water every few months to prevent salt buildup.
Lastly, Vanda orchids benefit from regular grooming and maintenance. Remove any dead or yellowing leaves to promote new growth. Additionally, if the aerial roots become too long, you can trim them back to a manageable length. This will help the orchid conserve energy and focus on blooming.
In conclusion, growing Vanda orchids can be a rewarding experience with the right knowledge and care. Remember to choose the appropriate potting medium, provide adequate light and humidity, water properly, fertilize regularly, and maintain the plants through grooming. With these steps in mind, you’ll be well on your way to cultivating and maintaining beautiful Vanda orchids in your own home.
Essential Tips for Maintaining Healthy Vanda Orchids
Vanda orchids are known for their vibrant and exotic blooms, making them a popular choice among orchid enthusiasts. However, cultivating and maintaining these beautiful plants can be a bit challenging for beginners. In this article, we will provide you with essential tips to help you keep your Vanda orchids healthy and thriving.
First and foremost, it is important to understand the natural habitat of Vanda orchids. These orchids are native to tropical regions, where they grow on trees and rocks. Therefore, they require a lot of light to thrive. Place your Vanda orchids in a location where they can receive bright, indirect sunlight for at least six hours a day. A south-facing window or a spot under fluorescent lights can be ideal for them.
In addition to light, Vanda orchids also need proper air circulation. This is because they have aerial roots that absorb moisture and nutrients from the air. To ensure good air circulation, avoid overcrowding your orchids and provide enough space between them. You can also use a small fan to gently move the air around your plants.
Watering is another crucial aspect of maintaining healthy Vanda orchids. These orchids prefer to be watered in the morning, allowing their roots to dry out before nightfall. Use room temperature water and thoroughly soak the roots and potting medium. However, be careful not to overwater them, as this can lead to root rot. A good rule of thumb is to water your Vanda orchids when the potting medium feels dry to the touch.
When it comes to potting, Vanda orchids have unique requirements. Unlike other orchids, they do not grow in soil. Instead, they are typically grown in baskets or pots with a coarse potting medium, such as bark or sphagnum moss. This allows for better air circulation and drainage. Repot your Vanda orchids every two to three years, or when the potting medium starts to break down.
Fertilizing is essential for the healthy growth of Vanda orchids. Use a balanced orchid fertilizer with a ratio of 20-20-20 or 30-10-10. Dilute the fertilizer to half the recommended strength and apply it every two weeks during the growing season. During the winter months, reduce the frequency to once a month. Be sure to flush the potting medium with plain water every few months to prevent salt buildup.
Lastly, Vanda orchids thrive in warm and humid conditions. The ideal temperature range for these orchids is between 70°F and 85°F during the day, and around 60°F at night. To increase humidity, you can place a tray filled with water near your orchids or use a humidifier. Misting the leaves can also help, but avoid misting the flowers directly as this can cause them to rot.
In conclusion, cultivating and maintaining Vanda orchids requires attention to their specific needs. Providing them with ample light, good air circulation, and proper watering is crucial for their overall health. Additionally, using the right potting medium, fertilizing regularly, and maintaining the right temperature and humidity levels will help your Vanda orchids thrive. With these essential tips in mind, you can enjoy the beauty of these exotic orchids in your own home.
Common Problems and Solutions in Cultivating Vanda Orchids
Cultivating and maintaining Vanda orchids can be a rewarding and fulfilling hobby. These beautiful and exotic flowers are known for their vibrant colors and unique shapes, making them a favorite among orchid enthusiasts. However, like any plant, Vanda orchids can face certain problems that may hinder their growth and overall health. In this section, we will discuss some common problems that you may encounter when cultivating Vanda orchids and provide you with practical solutions to help you overcome these challenges.
One of the most common problems faced by Vanda orchids is overwatering. These orchids are epiphytes, which means they naturally grow on trees and absorb moisture from the air and rain. Therefore, they have adapted to survive in environments with high humidity and good air circulation. Overwatering can lead to root rot and other fungal diseases, which can be detrimental to the health of your orchid. To avoid overwatering, it is important to allow the roots to dry out between waterings. You can achieve this by watering your Vanda orchid thoroughly and then allowing the potting medium to dry out before watering again.
Another problem that Vanda orchids may face is inadequate light. These orchids require bright, indirect light to thrive. Insufficient light can result in weak growth, lack of flowering, and even yellowing of the leaves. To ensure that your Vanda orchid receives enough light, place it near a window with filtered sunlight or use artificial grow lights. It is important to note that direct sunlight can scorch the leaves of Vanda orchids, so it is best to provide them with indirect light.
Pests can also pose a problem for Vanda orchids. Common pests that may infest these orchids include aphids, mealybugs, and spider mites. These pests can cause damage to the leaves and flowers of your orchid if left untreated. To control pests, regularly inspect your orchid for any signs of infestation and take immediate action. You can use insecticidal soap or neem oil to treat the affected areas. Additionally, maintaining good air circulation and cleanliness in your growing area can help prevent pest infestations.
Temperature fluctuations can also affect the health of Vanda orchids. These orchids prefer warm temperatures during the day, ranging from 70 to 85 degrees Fahrenheit, and slightly cooler temperatures at night. Drastic temperature changes can cause stress to your orchid and may result in stunted growth or bud drop. To maintain a stable temperature for your Vanda orchid, avoid placing it near drafts or vents. You can also use a humidifier or mist the leaves with water to create a more favorable environment.
Lastly, improper fertilization can hinder the growth and flowering of Vanda orchids. These orchids require regular feeding to provide them with the necessary nutrients for healthy growth. Use a balanced orchid fertilizer and follow the instructions on the label for proper application. It is important not to over-fertilize your orchid, as this can lead to salt buildup and damage the roots. A general rule of thumb is to fertilize your Vanda orchid every two weeks during the growing season and reduce the frequency during the dormant period.
In conclusion, cultivating and maintaining Vanda orchids can be a delightful experience. By being aware of common problems and implementing the appropriate solutions, you can ensure the health and vitality of your orchids. Remember to avoid overwatering, provide adequate light, control pests, maintain stable temperatures, and fertilize properly. With proper care and attention, your Vanda orchids will reward you with stunning blooms and bring joy to your home or garden.
Advanced Techniques for Maximizing Vanda Orchid Blooms
Vanda orchids are known for their stunning blooms and vibrant colors, making them a popular choice among orchid enthusiasts. However, cultivating and maintaining these beautiful plants can be a bit challenging, especially for beginners. In this guide, we will explore some advanced techniques that can help you maximize the blooms of your Vanda orchids.
One important aspect of cultivating Vanda orchids is providing them with the right growing conditions. These orchids thrive in bright, indirect light, so placing them near a south-facing window or under grow lights can ensure they receive adequate light. It’s important to avoid direct sunlight, as it can scorch the leaves and flowers.
In terms of temperature, Vanda orchids prefer warm conditions, with daytime temperatures ranging from 70 to 85 degrees Fahrenheit. Nighttime temperatures should be slightly cooler, around 60 to 70 degrees Fahrenheit. Maintaining these temperature ranges can help stimulate blooming in your Vanda orchids.
Proper watering is crucial for the health and blooming of Vanda orchids. These orchids are epiphytes, meaning they naturally grow on trees and absorb moisture from the air and rain. To mimic their natural habitat, it’s best to water Vanda orchids early in the morning, allowing the roots to dry out before nightfall. This helps prevent root rot and fungal diseases.
One effective watering technique for Vanda orchids is the “soak and dry” method. This involves fully immersing the orchid’s roots in water for about 10 to 15 minutes, allowing them to absorb moisture. After soaking, let the excess water drain out completely before returning the orchid to its growing area. This method ensures that the roots receive enough hydration without becoming waterlogged.
Fertilizing Vanda orchids is another important aspect of their care. These orchids have high nutrient requirements, so regular feeding is necessary for optimal growth and blooming. Use a balanced orchid fertilizer with a ratio of 20-20-20 or 30-10-10, diluted to half the recommended strength. Apply the fertilizer every two weeks during the growing season, and reduce frequency during the dormant period.
In addition to proper care, Vanda orchids may benefit from some advanced techniques to maximize their blooms. One such technique is called “topping.” This involves cutting off the top portion of the orchid’s spike after it has finished blooming. By doing this, you encourage the plant to produce new side shoots, resulting in more flowers.
Another technique is called “backbulbing.” This involves removing the older, non-productive bulbs from the orchid to redirect energy towards new growth. Backbulbing can help rejuvenate the plant and promote more vigorous blooming.
Lastly, providing proper support for Vanda orchids is essential. These orchids have aerial roots that need to be anchored to prevent them from tangling or breaking. You can use specialized Vanda baskets or wooden slats to support the orchid and allow the roots to grow freely. Regularly check the support system and adjust as needed to ensure the orchid remains stable.
In conclusion, cultivating and maintaining Vanda orchids requires attention to detail and some advanced techniques. Providing the right growing conditions, proper watering, and regular fertilizing are essential for their health and blooming. Additionally, advanced techniques such as topping and backbulbing can help maximize the number of blooms. With proper care and a little extra effort, you can enjoy the stunning beauty of Vanda orchids in your home or garden.


