Introduction
The Guide to Drying and Storing Fresh Garden Herbs provides essential information on how to preserve the flavors and aromas of your homegrown herbs for future use. Whether you have an abundance of herbs in your garden or want to make the most of store-bought herbs, this guide will walk you through the step-by-step process of drying and storing them properly. By following these guidelines, you can extend the lifespan of your herbs, ensuring that you have a readily available supply of flavorful ingredients to enhance your culinary creations throughout the year.
The Benefits of Drying and Storing Fresh Garden Herbs
Fresh garden herbs are a delightful addition to any dish, adding a burst of flavor and a touch of freshness. However, if you have an abundance of herbs in your garden, you may find it challenging to use them all before they start to wilt. That’s where drying and storing fresh garden herbs come in handy. Not only does this method allow you to preserve the herbs for future use, but it also helps to concentrate their flavors, making them even more potent and aromatic.
One of the primary benefits of drying and storing fresh garden herbs is the ability to extend their shelf life. Fresh herbs have a relatively short lifespan, and if not used promptly, they can quickly lose their vibrant colors and flavors. By drying them, you can ensure that they remain usable for an extended period. This is particularly useful if you have an abundance of herbs or if you want to enjoy their flavors during the winter months when fresh herbs may be harder to come by.
Another advantage of drying and storing fresh garden herbs is the convenience it offers. When you have dried herbs readily available in your pantry, you can easily add them to your dishes without the need to run to the store or spend time harvesting them from your garden. This is especially beneficial for busy individuals who want to add a touch of freshness to their meals without the hassle of dealing with fresh herbs every time.
Furthermore, drying and storing fresh garden herbs allows you to experiment with different flavor combinations. By having a variety of dried herbs at your disposal, you can easily mix and match them to create unique blends that suit your taste preferences. Whether you’re making a savory sauce, a fragrant tea, or a flavorful marinade, having a selection of dried herbs on hand gives you the freedom to get creative in the kitchen.
Additionally, drying and storing fresh garden herbs can be a cost-effective solution. Buying fresh herbs from the store can be quite expensive, especially if you use them frequently. By growing your own herbs and drying them, you can save money in the long run. Plus, you have the added benefit of knowing exactly where your herbs come from and how they were grown, ensuring that you’re using the freshest and most natural ingredients in your cooking.
Lastly, drying and storing fresh garden herbs is a great way to reduce waste. If you find yourself with an abundance of herbs that you can’t use before they spoil, drying them is an excellent way to prevent them from going to waste. Instead of throwing them away, you can preserve their flavors and enjoy them for months to come.
In conclusion, drying and storing fresh garden herbs offer numerous benefits. From extending their shelf life and enhancing their flavors to providing convenience and cost savings, this method is a fantastic way to make the most of your herb garden. So, the next time you find yourself with an abundance of herbs, consider drying and storing them to enjoy their flavors all year round.
Step-by-Step Guide to Drying Fresh Garden Herbs
Fresh garden herbs are a delightful addition to any dish, adding a burst of flavor and freshness that can elevate even the simplest of meals. However, if you have an abundance of herbs in your garden, you may find yourself wondering what to do with all of them before they go bad. One great way to preserve the flavors of your herbs is by drying and storing them. In this step-by-step guide, we will walk you through the process of drying fresh garden herbs so that you can enjoy their flavors all year round.
Step 1: Harvesting the Herbs
The first step in drying fresh garden herbs is to harvest them at the right time. The best time to harvest herbs is in the morning, after the dew has dried but before the sun is too hot. This is when the herbs are at their peak flavor. Use a pair of sharp scissors or pruning shears to cut the herbs, making sure to leave enough stem for the plant to continue growing.
Step 2: Cleaning the Herbs
Once you have harvested your herbs, it’s important to clean them thoroughly to remove any dirt or insects. Fill a large bowl with cold water and gently swish the herbs around to loosen any debris. Then, remove the herbs from the water and pat them dry with a clean towel.
Step 3: Bundling the Herbs
After cleaning the herbs, it’s time to bundle them together for drying. Take a small handful of herbs and tie them together at the base with a piece of twine or string. Make sure the bundle is not too large, as this can prevent proper airflow and lead to mold. Repeat this process with the rest of your herbs.
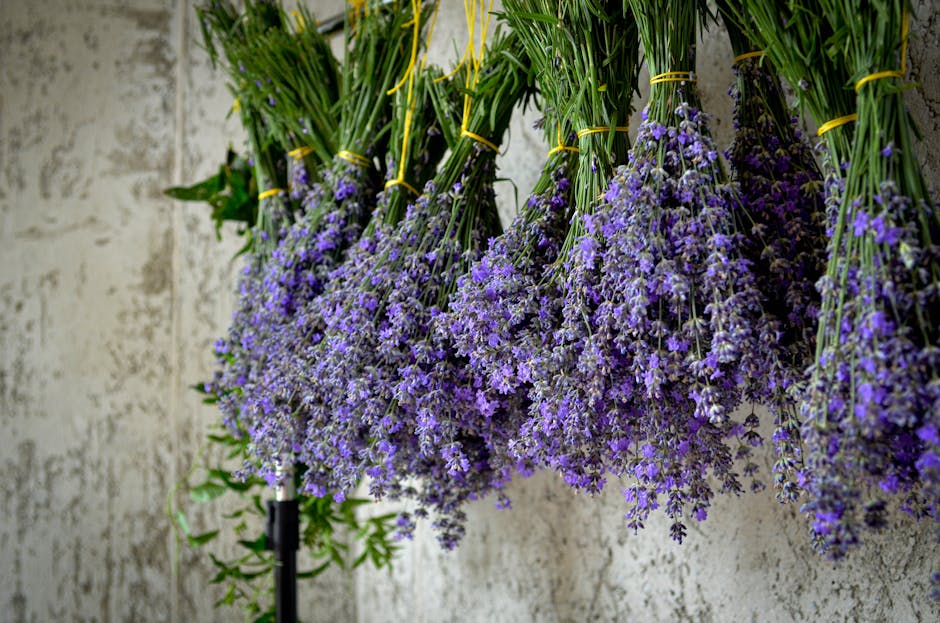
Step 4: Hanging the Bundles
Once your herbs are bundled, find a warm, dry place to hang them. This could be a sunny window, a well-ventilated room, or even a covered porch. Hang the herb bundles upside down, making sure they are not touching each other. This allows for proper airflow and helps the herbs dry evenly.
Step 5: Patience is Key
Drying herbs is a slow process, so it’s important to be patient. Depending on the humidity and temperature in your area, it can take anywhere from a few days to a few weeks for your herbs to fully dry. You will know they are ready when the leaves crumble easily between your fingers.
Step 6: Storing the Dried Herbs
Once your herbs are dry, it’s time to store them properly to maintain their flavor and freshness. Remove the leaves from the stems and place them in airtight containers, such as glass jars or resealable bags. Make sure to label the containers with the name of the herb and the date of drying. Store the containers in a cool, dark place, away from direct sunlight and heat.
By following these simple steps, you can easily dry and store your fresh garden herbs, ensuring that you have a supply of flavorful herbs all year round. Whether you use them in cooking, teas, or homemade beauty products, dried herbs are a versatile and convenient way to enjoy the flavors and benefits of your garden. So go ahead, get harvesting, and start preserving the flavors of your garden today!
Creative Ways to Store and Organize Dried Garden Herbs
Fresh garden herbs are a delightful addition to any dish, adding a burst of flavor and freshness that can elevate even the simplest of meals. However, when the growing season comes to an end, it’s important to find creative ways to store and organize your dried garden herbs so that you can continue to enjoy their flavors throughout the year.
One of the easiest and most popular methods of drying herbs is air drying. This method involves tying small bunches of herbs together and hanging them upside down in a warm, well-ventilated area. As the herbs dry, their flavors become concentrated, making them perfect for use in soups, stews, and sauces. Once the herbs are completely dry, you can remove the leaves from the stems and store them in airtight containers. Mason jars or small glass containers work well for this purpose, as they help to preserve the herbs’ flavors and aromas.
Another creative way to store and organize dried garden herbs is by making herb-infused oils. This not only allows you to preserve the flavors of your herbs but also adds a unique twist to your cooking. To make herb-infused oils, simply place a handful of dried herbs in a clean glass jar and cover them with a high-quality oil, such as olive or grapeseed oil. Let the herbs steep in the oil for a few weeks, shaking the jar occasionally to ensure that the flavors are evenly distributed. Once the oil has infused with the herbs, strain out the solids and transfer the oil to a clean, airtight bottle. This herb-infused oil can be used in salad dressings, marinades, or drizzled over roasted vegetables for a burst of flavor.
If you’re looking for a more visually appealing way to store and organize your dried garden herbs, consider creating herb bouquets. This involves arranging dried herbs in a decorative manner and displaying them in your kitchen or dining area. Not only do herb bouquets add a touch of natural beauty to your space, but they also serve as a convenient way to access your herbs when cooking. Simply pluck a few leaves from the bouquet as needed and enjoy the fresh flavors they bring to your dishes.
For those who prefer a more compact and portable option, herb sachets are a great choice. Herb sachets are small fabric bags filled with dried herbs, which can be placed in drawers, closets, or even your car to add a pleasant aroma. To make herb sachets, cut small squares of breathable fabric, such as muslin or cheesecloth, and fill them with a mixture of dried herbs. Tie the sachets closed with a ribbon or string, and they’re ready to use. Not only do herb sachets keep your dried herbs organized, but they also make lovely gifts for friends and family.
In conclusion, there are many creative ways to store and organize dried garden herbs. Whether you choose to air dry them, make herb-infused oils, create herb bouquets, or make herb sachets, the key is to find a method that suits your needs and preferences. By taking the time to properly dry and store your herbs, you can enjoy their flavors and aromas all year round, adding a touch of freshness to your meals and a sense of satisfaction knowing that you’ve preserved a piece of your garden.
Tips for Preserving the Flavor and Aroma of Fresh Garden Herbs
Fresh garden herbs are a delightful addition to any dish, adding a burst of flavor and aroma that can elevate even the simplest of meals. However, if you have a bountiful herb garden, you may find yourself with more herbs than you can use at once. The good news is that you can easily preserve the flavor and aroma of your fresh garden herbs by drying and storing them properly. In this guide, we will provide you with some tips to help you preserve the essence of your herbs for months to come.
When it comes to drying herbs, timing is everything. The best time to harvest your herbs for drying is in the morning, after the dew has evaporated but before the sun is at its peak. This is when the essential oils in the herbs are at their highest concentration, ensuring maximum flavor and aroma. Simply cut the stems of your herbs, leaving a few inches at the base, and gently shake off any excess dirt or insects.
Once you have harvested your herbs, it’s time to prepare them for drying. Start by removing any damaged or discolored leaves, as these can affect the quality of your dried herbs. Then, give your herbs a gentle rinse under cold water to remove any remaining dirt or debris. Pat them dry with a clean towel or paper towel, being careful not to bruise or crush the leaves.
Now it’s time to choose your drying method. There are several options available, depending on your preference and the space you have available. One popular method is air drying, which involves tying small bunches of herbs together with twine and hanging them upside down in a warm, dry place. This allows the herbs to dry naturally over a period of one to two weeks. Another option is to use a dehydrator, which speeds up the drying process by circulating warm air around the herbs. This method typically takes only a few hours to complete.
Regardless of the drying method you choose, it’s important to monitor the progress of your herbs regularly. Check for any signs of mold or mildew, and discard any herbs that show these signs. Once your herbs are completely dry, they should crumble easily between your fingers. At this point, you can remove the leaves from the stems and store them in airtight containers, such as glass jars or resealable bags. Be sure to label your containers with the name and date of the herb, as well as any special instructions for use.
When it comes to storing your dried herbs, there are a few key factors to consider. First, keep them away from direct sunlight, as this can cause the herbs to lose their flavor and color. Second, store them in a cool, dry place to prevent moisture from seeping in and causing mold or spoilage. Finally, avoid storing your herbs near strong-smelling substances, as they can absorb odors easily.
By following these tips, you can ensure that your fresh garden herbs retain their flavor and aroma long after the growing season has ended. Whether you choose to air dry or use a dehydrator, the key is to harvest your herbs at the right time and handle them with care. With a little bit of effort, you can enjoy the taste of your garden all year round. So go ahead, get out there and start drying those herbs!
Delicious Recipes Using Dried Garden Herbs
Fresh garden herbs are a wonderful addition to any dish, adding flavor and aroma that can elevate even the simplest of recipes. But what happens when you have an abundance of herbs and can’t use them all before they start to wilt? Drying and storing your fresh garden herbs is a great way to preserve their flavors and ensure that you can enjoy them all year round. In this article, we will guide you through the process of drying and storing your herbs, and also provide you with some delicious recipes that make use of dried garden herbs.
Once you have harvested your herbs, it’s important to wash them thoroughly to remove any dirt or insects. After washing, gently pat them dry with a clean towel. Now, you have two options for drying your herbs: air drying or using a dehydrator. Air drying is the more traditional method and requires a bit of patience. Simply tie small bunches of herbs together with twine and hang them upside down in a warm, dry place. Make sure to choose a location away from direct sunlight, as this can cause the herbs to lose their color and flavor. It usually takes about two weeks for the herbs to fully dry using this method.
If you’re short on time or prefer a quicker method, using a dehydrator is a great option. Spread the herbs out in a single layer on the dehydrator trays and set the temperature to around 95°F (35°C). Leave them in the dehydrator for about 1-2 hours, or until they are completely dry and crumbly to the touch. The advantage of using a dehydrator is that it preserves the color and flavor of the herbs better than air drying.
Once your herbs are dry, it’s time to store them properly to maintain their freshness. The best way to store dried herbs is in airtight containers, such as glass jars with tight-fitting lids. Make sure to label each jar with the name of the herb and the date of drying. Store the jars in a cool, dark place, away from heat and moisture. This will help to preserve the flavor and potency of the herbs for up to a year.
Now that you have a stash of dried garden herbs, it’s time to put them to good use in some delicious recipes. One classic recipe that makes great use of dried herbs is homemade Italian seasoning. Simply mix together dried basil, oregano, thyme, rosemary, and marjoram in equal parts. This versatile seasoning can be used in pasta sauces, soups, and marinades, adding a burst of flavor to your dishes.
Another tasty recipe is herb-infused olive oil. Combine dried herbs such as rosemary, thyme, and garlic with extra virgin olive oil in a glass jar. Let the mixture sit for a few weeks to allow the flavors to infuse into the oil. This herb-infused olive oil is perfect for drizzling over salads, roasted vegetables, or even as a dip for crusty bread.
In conclusion, drying and storing fresh garden herbs is a simple and effective way to preserve their flavors and enjoy them all year round. Whether you choose to air dry or use a dehydrator, make sure to store your dried herbs in airtight containers in a cool, dark place. And don’t forget to try out some delicious recipes using your dried garden herbs, such as homemade Italian seasoning or herb-infused olive oil. With these tips and recipes, you’ll never have to let your fresh herbs go to waste again.


