Introduction
This guide provides valuable information on harvesting garlic and garlic scapes, as well as tips for winter storage. Whether you are a seasoned gardener or a beginner, these tips will help you maximize the yield and quality of your garlic harvest, ensuring that you can enjoy its delicious flavor throughout the winter months.
The Benefits of Harvesting Garlic and Garlic Scapes
Garlic is a versatile and flavorful ingredient that is used in a wide variety of dishes. Not only does it add a delicious taste to your meals, but it also offers numerous health benefits. If you are a garlic lover and have decided to grow your own garlic, it’s important to know when and how to harvest it. In this article, we will guide you through the process of harvesting garlic and garlic scapes, as well as provide tips for winter storage.
One of the main benefits of harvesting garlic is that you can enjoy the freshest and most flavorful garlic possible. When you grow your own garlic, you have control over the growing conditions and can ensure that it is free from any harmful chemicals or pesticides. This means that the garlic you harvest will be of the highest quality and taste.
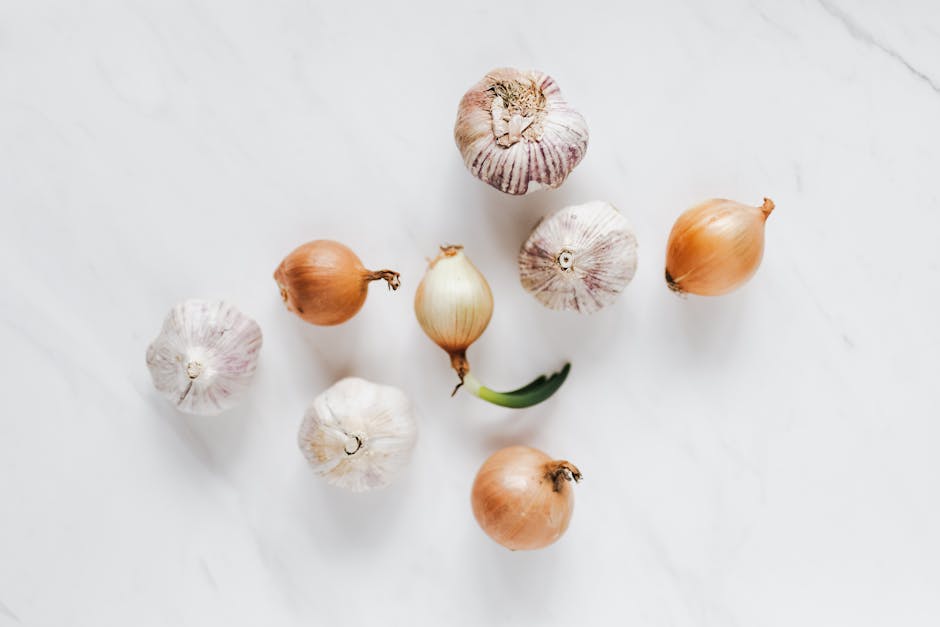
Another benefit of harvesting garlic is that you can also harvest garlic scapes. Garlic scapes are the curly green shoots that emerge from the garlic plant. These scapes are not only delicious but also offer a milder garlic flavor compared to the bulbs. Harvesting garlic scapes not only allows you to enjoy a different part of the garlic plant but also encourages the bulbs to grow larger.
Now that you understand the benefits of harvesting garlic and garlic scapes, let’s dive into the process. Garlic is typically ready to be harvested when the leaves start to turn yellow and dry out. This usually occurs in late spring or early summer, depending on your location. To harvest garlic, gently loosen the soil around the bulbs using a garden fork or shovel. Be careful not to damage the bulbs in the process.
Once the bulbs are loosened, carefully lift them out of the ground. It’s important to handle the bulbs gently to avoid bruising or damaging them. Shake off any excess soil and lay the bulbs out in a single layer to dry. This drying process allows the outer layers of the bulbs to harden, which will help them store better.
While you are harvesting garlic, don’t forget about the garlic scapes. To harvest garlic scapes, simply snap them off where they emerge from the plant. You can use scissors or your hands to do this. It’s best to harvest garlic scapes when they are still young and tender, as they can become tough and woody if left on the plant for too long.
Once you have harvested your garlic and garlic scapes, it’s time to think about winter storage. Garlic bulbs should be stored in a cool, dry, and well-ventilated place. You can hang them in bundles or store them in mesh bags to allow for air circulation. Avoid storing garlic bulbs in plastic bags or containers, as this can cause them to rot.
Garlic scapes, on the other hand, can be stored in the refrigerator for up to a week. If you have an abundance of garlic scapes, you can also freeze them for later use. Simply chop them into small pieces and place them in a freezer bag or container.
In conclusion, harvesting garlic and garlic scapes not only allows you to enjoy the freshest and most flavorful garlic but also offers numerous health benefits. By following the proper harvesting techniques and storing them correctly, you can enjoy your homegrown garlic throughout the winter months. So why not give it a try and start growing your own garlic today?
Step-by-Step Guide to Harvesting Garlic and Garlic Scapes
Garlic is a versatile and flavorful ingredient that is a staple in many kitchens. Whether you grow your own garlic or purchase it from a local farmer, knowing how to properly harvest and store garlic is essential to ensure its freshness and flavor. In this step-by-step guide, we will walk you through the process of harvesting garlic and garlic scapes, as well as provide tips for winter storage.
The first step in harvesting garlic is to determine when it is ready to be harvested. Garlic is typically ready to be harvested when the lower leaves start to turn yellow and dry out. This usually occurs in late spring or early summer, depending on your location. It’s important to keep an eye on your garlic plants and not wait too long to harvest, as the bulbs can split and lose their flavor if left in the ground for too long.
To harvest garlic, start by gently loosening the soil around the bulbs with a garden fork or shovel. Be careful not to damage the bulbs in the process. Once the soil is loosened, carefully lift the bulbs out of the ground, taking care to keep the stems intact. Avoid pulling on the stems, as this can damage the bulbs.
After harvesting the garlic bulbs, it’s time to harvest the garlic scapes. Garlic scapes are the curly, green shoots that emerge from the garlic plant. They are not only delicious but also help redirect the plant’s energy towards bulb development. To harvest garlic scapes, simply snap or cut them off where they emerge from the plant. This will encourage the bulbs to grow larger.
Once you have harvested both the garlic bulbs and scapes, it’s time to prepare them for storage. Start by gently brushing off any excess dirt from the bulbs and scapes. Avoid washing them, as moisture can lead to rot during storage. Trim the roots and cut off the stems, leaving about an inch of stem attached to the bulb.
Next, it’s important to cure the garlic bulbs before storing them for the winter. Curing allows the bulbs to dry out and develop their full flavor. To cure garlic, lay the bulbs and scapes in a single layer in a cool, dry, and well-ventilated area. Avoid direct sunlight, as it can cause the bulbs to become bitter. Allow the garlic to cure for about two to three weeks, or until the outer skins are dry and papery.
Once the garlic bulbs are fully cured, it’s time to store them for the winter. The ideal storage conditions for garlic are cool and dry, with a temperature between 50 and 60 degrees Fahrenheit and a humidity level of around 60 to 70 percent. A basement or root cellar is often the best place to store garlic. Avoid storing garlic in the refrigerator, as the cold temperature can cause the bulbs to sprout prematurely.
To store garlic, you can either braid the stems together or place the bulbs in mesh bags or baskets. This allows for good air circulation, which helps prevent mold and rot. Check on your stored garlic regularly and remove any bulbs that show signs of spoilage.
By following these simple steps, you can ensure that your harvested garlic and garlic scapes stay fresh and flavorful throughout the winter months. So go ahead and enjoy the fruits of your labor by adding delicious garlic to your favorite recipes all year round.
Tips for Proper Winter Storage of Garlic and Garlic Scapes
Garlic is a versatile and flavorful ingredient that is used in a wide variety of dishes. Whether you grow your own garlic or purchase it from a local farmer’s market, proper storage is essential to ensure that it stays fresh and flavorful throughout the winter months. In this article, we will provide you with some helpful tips for harvesting garlic and garlic scapes, as well as how to store them properly for winter use.
When it comes to harvesting garlic, timing is key. Garlic bulbs are typically ready to be harvested when the lower leaves start to turn yellow and dry out. This usually occurs in late summer or early fall, depending on your location. To harvest the bulbs, gently loosen the soil around the base of the plant with a garden fork or shovel. Be careful not to damage the bulbs in the process. Once the bulbs are loosened, carefully lift them out of the ground, taking care to remove any excess soil.
After harvesting the garlic bulbs, it’s important to cure them properly before storing them for the winter. Curing allows the bulbs to dry out and develop a protective layer that helps to prevent rot and mold. To cure your garlic, lay the bulbs out in a single layer in a cool, dry, and well-ventilated area. Avoid direct sunlight, as this can cause the bulbs to become too hot and spoil. Allow the bulbs to cure for about two to three weeks, or until the outer skins are dry and papery.
Once your garlic bulbs are properly cured, it’s time to prepare them for winter storage. Start by trimming off the roots and cutting off the stalks, leaving about an inch of stem attached to the bulb. This will help to prevent the bulbs from drying out too much during storage. Avoid washing the bulbs, as moisture can lead to rot. Instead, gently brush off any excess dirt or soil.
Now that your garlic bulbs are trimmed and cleaned, it’s time to choose the best storage method. One popular option is to store the bulbs in mesh bags or baskets. This allows for good air circulation and helps to prevent moisture buildup. Another option is to braid the garlic bulbs together and hang them in a cool, dry place. This not only looks beautiful but also allows for easy access to the bulbs throughout the winter.
In addition to harvesting garlic bulbs, you may also have garlic scapes to harvest. Garlic scapes are the curly, green shoots that emerge from the garlic plant in early summer. These scapes are not only delicious but also help to divert energy away from the bulb, resulting in larger and more flavorful garlic cloves. To harvest garlic scapes, simply snap them off where they emerge from the plant. Use them in stir-fries, pesto, or pickled for a tasty treat.
When it comes to storing garlic scapes, they can be kept in the refrigerator for up to a week. To extend their shelf life, you can also blanch and freeze them for later use. Simply blanch the scapes in boiling water for a minute or two, then transfer them to an ice bath to cool. Once cooled, drain and pack them into freezer-safe containers or bags.
In conclusion, proper harvesting and storage of garlic and garlic scapes are essential for enjoying their flavors throughout the winter months. By following these tips, you can ensure that your garlic stays fresh and flavorful until the next growing season. So go ahead, harvest your garlic and garlic scapes, and enjoy the taste of summer all winter long.
How to Cure Garlic and Garlic Scapes for Long-Term Storage
Garlic is a versatile and flavorful ingredient that can enhance the taste of any dish. Whether you grow your own garlic or purchase it from a local farmer’s market, knowing how to properly harvest and store garlic is essential for long-term use. In this guide, we will walk you through the process of curing garlic and garlic scapes for winter storage, ensuring that you have a fresh supply of this aromatic herb all year round.
Harvesting garlic is a rewarding experience that requires a bit of patience. The best time to harvest garlic is when the leaves start to turn yellow and dry out, usually in late summer or early fall. To harvest garlic, gently loosen the soil around the bulbs using a garden fork or shovel. Be careful not to damage the bulbs as you dig them up.
Once you have harvested your garlic, it’s time to cure it. Curing is the process of drying the garlic to remove excess moisture and improve its flavor and shelf life. To cure garlic, you will need a well-ventilated area with low humidity. A garage or a covered porch works well for this purpose.
Start by trimming the roots and removing any excess dirt from the bulbs. Be careful not to remove too many layers of the outer skin, as this can expose the cloves and make them more susceptible to spoilage. Leave the stalks intact, as they will help in the curing process.
Next, create bundles of garlic by tying the stalks together with twine or string. Hang the bundles upside down in a cool, dry place. Make sure to leave enough space between the bundles for air circulation. The garlic will take about two to four weeks to cure, depending on the humidity and temperature of the curing area.
During the curing process, the garlic bulbs will gradually dry out and develop a papery skin. This is a sign that the garlic is curing properly. Check on the garlic regularly and remove any bulbs that show signs of rot or mold. Proper air circulation is crucial to prevent spoilage, so make sure the curing area is well-ventilated.
Once the garlic is fully cured, it’s time to prepare it for long-term storage. Start by trimming the stalks to about an inch above the bulb. This will help prevent the garlic from sprouting during storage. Brush off any excess dirt from the bulbs, but avoid washing them as moisture can promote spoilage.
Now that your garlic is cured and trimmed, it’s ready for storage. The ideal storage conditions for garlic are cool and dry, with a temperature between 50 and 60 degrees Fahrenheit and a humidity level of around 60 to 70 percent. A basement or a pantry with good air circulation is perfect for storing garlic.
Store the garlic bulbs in a mesh bag or a well-ventilated container to allow for air circulation. Avoid storing garlic in plastic bags or airtight containers, as this can trap moisture and cause the bulbs to rot. Check on your stored garlic regularly and remove any bulbs that show signs of spoilage.
In addition to harvesting garlic bulbs, you can also harvest garlic scapes. Garlic scapes are the curly green shoots that emerge from the garlic plant in early summer. They have a milder flavor than garlic bulbs and can be used in a variety of dishes, such as stir-fries, pesto, and soups.
To harvest garlic scapes, wait until they have curled and straightened out. Use a sharp pair of scissors or pruners to cut the scapes just above the top set of leaves. Harvesting the scapes will redirect the plant’s energy towards bulb development, resulting in larger garlic bulbs.
Like garlic bulbs, garlic scapes can also be cured and stored for later use. Simply follow the same curing and storage process as described earlier. Garlic scapes will take less time to cure, usually about one to two weeks.
By following these tips for curing and storing garlic and garlic scapes, you can enjoy the flavors of this aromatic herb all year round. Harvesting and curing garlic is a labor of love, but the reward of having a fresh supply of garlic in your pantry during the winter months is well worth the effort. So go ahead, get your hands dirty, and start harvesting and curing garlic today!
Creative Ways to Use Garlic Scapes in Your Cooking
Garlic is a versatile and flavorful ingredient that adds a delicious kick to any dish. While most people are familiar with using garlic bulbs in their cooking, many may not be aware of the culinary potential of garlic scapes. These curly green shoots that emerge from the garlic plant in early summer are not only delicious but also offer a unique twist to your recipes. In this article, we will explore creative ways to use garlic scapes in your cooking, allowing you to make the most of this seasonal ingredient.
One of the simplest and most popular ways to use garlic scapes is to chop them up and sauté them in olive oil. This method brings out their mild garlic flavor and adds a delightful crunch to your dishes. You can use sautéed garlic scapes as a topping for pizzas, pasta, or even as a garnish for soups and salads. Their vibrant green color also adds a visually appealing element to your meals.
If you’re feeling more adventurous, you can try making garlic scape pesto. Just like traditional basil pesto, garlic scape pesto combines the scapes with nuts, cheese, and olive oil to create a flavorful sauce. Simply blend the chopped scapes with some toasted pine nuts, grated Parmesan cheese, and olive oil until smooth. This pesto can be used as a spread on sandwiches, a dip for vegetables, or a sauce for pasta. The possibilities are endless!
Another creative way to incorporate garlic scapes into your cooking is by pickling them. Pickled garlic scapes make a tangy and crunchy addition to salads, sandwiches, and charcuterie boards. To pickle garlic scapes, trim off the tough ends and pack them tightly into sterilized jars. Then, heat equal parts vinegar and water in a saucepan, along with some salt, sugar, and spices like mustard seeds or peppercorns. Pour the hot brine over the scapes, seal the jars, and let them sit in the refrigerator for a week before enjoying the tangy goodness.
For those with a sweet tooth, garlic scape ice cream might sound unusual, but it’s surprisingly delicious. The mild garlic flavor pairs surprisingly well with the creamy sweetness of ice cream. To make garlic scape ice cream, simply infuse the scapes in warm milk and cream, strain them out, and proceed with your favorite ice cream recipe. The result is a unique and refreshing treat that will surely impress your guests.
Lastly, don’t forget that garlic scapes can also be used as a substitute for garlic bulbs in many recipes. Their milder flavor makes them a great option for those who find regular garlic too overpowering. You can use chopped scapes in stir-fries, soups, or roasted vegetable dishes, just like you would with garlic cloves. Experimenting with garlic scapes in your favorite recipes can add a fresh twist to familiar flavors.
In conclusion, garlic scapes are a versatile and delicious ingredient that can elevate your cooking to new heights. Whether you sauté them, make pesto, pickle them, or even use them in ice cream, garlic scapes offer a unique and flavorful addition to your culinary repertoire. So, the next time you come across these curly green shoots at your local farmers’ market or in your garden, don’t hesitate to get creative and explore the many ways you can incorporate them into your cooking.


