Introduction
Planting 1800 linear feet of potatoes requires careful planning and execution. This task involves preparing the soil, selecting the right potato variety, and ensuring proper spacing and planting techniques. In this introduction, we will explore the key considerations and steps involved in successfully planting such a large quantity of potatoes.
The Benefits of Planting Potatoes: A Guide to Maximizing Yield
Are you considering planting potatoes in your garden this year? If so, you’re in for a treat! Potatoes are not only delicious and versatile, but they also offer a range of benefits for both your garden and your dinner table. In this guide, we will explore the many advantages of planting potatoes and provide you with tips on how to maximize your yield.
One of the greatest benefits of planting potatoes is their high nutritional value. Potatoes are an excellent source of vitamins and minerals, including vitamin C, potassium, and fiber. By growing your own potatoes, you can ensure that you and your family are consuming fresh, nutrient-rich produce.
In addition to their nutritional value, potatoes are also relatively easy to grow. They can be planted in a variety of soil types and are adaptable to different climates. Whether you have a small backyard garden or a larger plot of land, potatoes can be successfully grown in containers, raised beds, or traditional garden rows.
When it comes to maximizing your potato yield, proper planting techniques are essential. Start by selecting high-quality seed potatoes from a reputable supplier. These seed potatoes should be firm, disease-free, and have at least one or two “eyes” or sprouts. It’s important to choose the right variety of potatoes for your growing conditions and culinary preferences. Some popular varieties include Yukon Gold, Russet, and Red Pontiac.
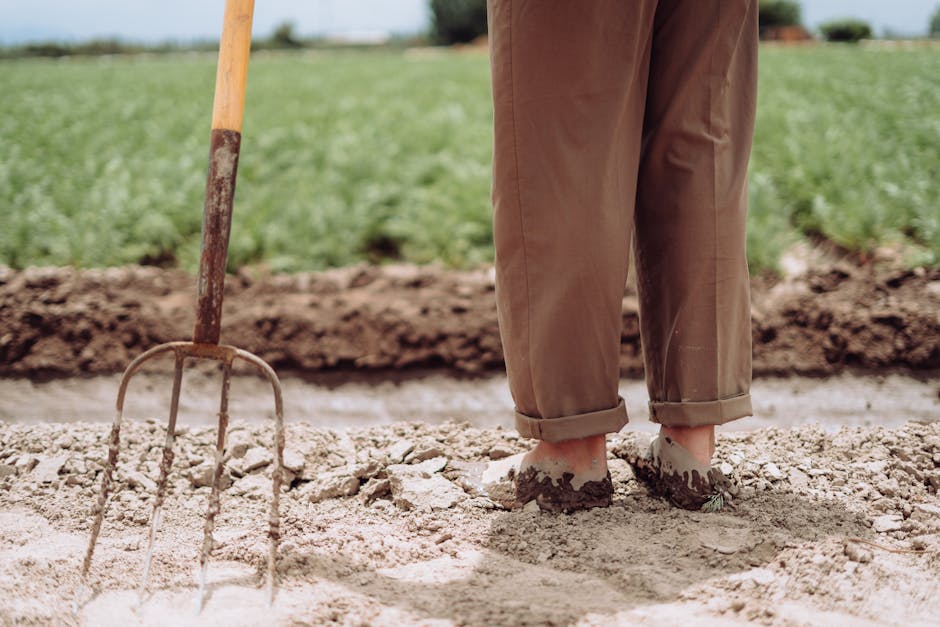
Before planting, prepare your soil by loosening it with a garden fork or tiller. Remove any rocks, weeds, or debris that may hinder the growth of your potatoes. Adding organic matter, such as compost or well-rotted manure, will improve soil fertility and drainage.
To plant your potatoes, dig a trench that is approximately six inches deep. Place the seed potatoes in the trench, spacing them about 12 inches apart. Cover the potatoes with soil, leaving a small mound or ridge on top. This will help with drainage and prevent the potatoes from being exposed to sunlight, which can turn them green and make them toxic.
As your potatoes grow, it’s important to provide them with adequate water and nutrients. Potatoes require consistent moisture, especially during the tuber formation stage. Water deeply once or twice a week, depending on rainfall and soil conditions. Applying a balanced fertilizer, such as a 10-10-10 or 14-14-14 blend, every four to six weeks will help promote healthy growth and maximize your yield.
To prevent diseases and pests, practice good garden hygiene. Remove any diseased or damaged foliage promptly and dispose of it away from your garden. Mulching around your potato plants with straw or shredded leaves will help suppress weeds and conserve moisture.
Harvesting your potatoes is an exciting and rewarding experience. Most varieties are ready to harvest when the foliage turns yellow and begins to die back. Gently dig around the base of the plants with a garden fork to loosen the soil and reveal the tubers. Carefully lift the potatoes from the ground, being careful not to damage them. Allow the potatoes to dry in a cool, dark place for a few days before storing them in a cool, dry location.
In conclusion, planting potatoes offers a range of benefits for both your garden and your dinner table. With proper planting techniques and care, you can maximize your yield and enjoy a bountiful harvest of delicious, homegrown potatoes. So why not give it a try this year? Your taste buds and your garden will thank you!
Step-by-Step Guide: How to Prepare and Plant 1800 Linear Feet of Potatoes
Are you ready to embark on the journey of planting 1800 linear feet of potatoes? This step-by-step guide will walk you through the process, ensuring that you have all the information you need to successfully prepare and plant your potatoes. So grab your gardening gloves and let’s get started!
First things first, you’ll need to choose a suitable location for your potato patch. Look for an area that receives full sun and has well-draining soil. Potatoes thrive in loose, fertile soil, so it’s a good idea to amend your soil with organic matter such as compost or aged manure.
Once you’ve selected your spot, it’s time to prepare the soil. Start by removing any weeds or grass from the area. You can do this by hand or use a garden tiller to make the job easier. Next, loosen the soil to a depth of about 8-10 inches, breaking up any clumps and removing any rocks or debris you come across.
After preparing the soil, it’s time to add some nutrients. Potatoes are heavy feeders, so incorporating a balanced fertilizer into the soil is essential. Follow the instructions on the fertilizer package for the correct application rate. Work the fertilizer into the top few inches of soil, ensuring that it is evenly distributed.
Now that your soil is prepped and ready, it’s time to plant your potatoes. Start by cutting your seed potatoes into pieces, making sure that each piece has at least one eye or bud. Allow the cut pieces to dry for a day or two before planting to prevent rotting.
To plant your potatoes, dig a trench that is about 4-6 inches deep. Place the seed potato pieces in the trench, spacing them about 12-15 inches apart. Cover the potatoes with soil, gently firming it around them. As the plants grow, you can gradually mound soil around the stems to encourage more tuber development.
Watering is crucial for the success of your potato crop. Keep the soil consistently moist but not waterlogged. A good rule of thumb is to provide about 1-2 inches of water per week, either through rainfall or irrigation. Be sure to water deeply, allowing the water to penetrate the soil to the root zone.
As your potato plants grow, they will require some maintenance. Keep an eye out for weeds and remove them promptly to prevent competition for nutrients and water. You may also need to provide support for the plants by staking or using cages, especially if you are growing tall varieties.
Harvesting your potatoes is the most exciting part of the process. Depending on the variety, potatoes are typically ready to harvest when the plants have died back and the foliage has turned yellow or brown. Carefully dig around the plants with a garden fork or shovel, being careful not to damage the tubers. Allow the potatoes to dry in a cool, dark place for a few days before storing them in a cool, dry location.
Congratulations! You have successfully planted 1800 linear feet of potatoes. With proper care and attention, you can look forward to a bountiful harvest of delicious spuds. So sit back, relax, and start planning all the wonderful potato dishes you’ll be enjoying in the months to come. Happy gardening!
Choosing the Right Potato Varieties for Your 1800 Linear Feet Planting Project
Are you planning to plant 1800 linear feet of potatoes? That’s quite an undertaking! But don’t worry, with the right potato varieties, your planting project will be a success. In this article, we will guide you through the process of choosing the perfect potato varieties for your 1800 linear feet planting project.
When it comes to selecting potato varieties, there are a few factors to consider. First and foremost, you need to think about the climate and growing conditions in your area. Different potato varieties have different requirements, so it’s important to choose ones that will thrive in your specific environment.
If you live in a cooler climate, you might want to consider planting early or mid-season potato varieties. These varieties have a shorter growing season and are more tolerant of cooler temperatures. Some popular early and mid-season potato varieties include Yukon Gold, Red Norland, and Kennebec.
On the other hand, if you live in a warmer climate, you’ll want to choose late-season potato varieties. These varieties require a longer growing season and are more heat-tolerant. Some popular late-season potato varieties include Russet Burbank, Pontiac, and German Butterball.
Another important factor to consider is the intended use of your potatoes. Are you planning to use them for baking, boiling, or frying? Different potato varieties have different textures and flavors, so it’s important to choose ones that will suit your culinary needs.
For baking, you’ll want to choose potato varieties that have a high starch content and a dry, fluffy texture. Some popular baking potato varieties include Russet Burbank, Idaho Russet, and King Edward.
If you’re planning to boil your potatoes, you’ll want to choose varieties that have a lower starch content and a waxy texture. These potatoes hold their shape well when cooked and are perfect for potato salads or stews. Some popular boiling potato varieties include Red Norland, Yukon Gold, and Fingerling.
Lastly, if you’re planning to fry your potatoes, you’ll want to choose varieties that have a medium starch content and a creamy texture. These potatoes crisp up nicely when fried and are perfect for making French fries or potato chips. Some popular frying potato varieties include Kennebec, Russet Burbank, and Maris Piper.
In addition to considering climate and culinary needs, it’s also a good idea to choose a mix of potato varieties. This will help ensure a continuous harvest throughout the growing season. By planting early, mid, and late-season varieties, you’ll have a steady supply of fresh potatoes from early summer to fall.
So, when it comes to choosing the right potato varieties for your 1800 linear feet planting project, remember to consider your climate, culinary needs, and the desire for a continuous harvest. With these factors in mind, you’ll be well on your way to a successful potato planting project. Happy planting!
Effective Techniques for Maintaining and Caring for Your Potato Crop
Planting 1800 Linear Feet of Potatoes
Potatoes are a versatile and nutritious crop that can be grown in a variety of climates and soil conditions. Whether you are a seasoned farmer or a beginner gardener, planting and caring for a large potato crop can be a rewarding and fulfilling experience. In this article, we will discuss effective techniques for maintaining and caring for your potato crop, specifically focusing on planting 1800 linear feet of potatoes.
Before you begin planting, it is important to choose the right variety of potatoes for your specific needs. There are countless varieties available, each with its own unique characteristics and flavor profiles. Consider factors such as cooking methods, storage capabilities, and disease resistance when selecting your potato variety.
Once you have chosen your potato variety, it is time to prepare the soil for planting. Potatoes thrive in loose, well-drained soil with a pH level between 5.0 and 6.0. Begin by removing any weeds or debris from the planting area. Then, use a garden fork or tiller to loosen the soil to a depth of at least 8 inches. Incorporate organic matter, such as compost or well-rotted manure, to improve soil fertility and structure.
To plant 1800 linear feet of potatoes, you will need to create rows that are approximately 3 feet apart. Using a hoe or shovel, create a trench along each row that is about 6 inches deep. Place your seed potatoes, which should be cut into pieces with at least two eyes each, into the trench, spacing them about 12 inches apart. Cover the seed potatoes with soil, gently firming it down to ensure good soil-to-potato contact.
As your potato plants begin to grow, it is important to provide them with proper care and maintenance. Regular watering is crucial, especially during dry periods. Aim to provide your potato plants with about 1 to 2 inches of water per week, either through rainfall or irrigation. Be careful not to overwater, as this can lead to rot and disease.
To prevent weeds from competing with your potato plants for nutrients and water, it is important to keep the planting area weed-free. Regularly hoe or hand-pull any weeds that appear, being careful not to disturb the potato plants’ shallow roots. Applying a layer of organic mulch, such as straw or wood chips, can also help suppress weed growth and conserve soil moisture.
As your potato plants grow taller, it is important to provide them with support to prevent them from falling over and damaging the tubers. This can be done by gently hilling up soil around the base of the plants, creating a small mound. This not only provides support but also encourages the development of additional tubers.
Harvesting your potato crop is an exciting and rewarding experience. Depending on the variety, potatoes are typically ready to harvest when the plants have died back and the foliage has turned yellow or brown. Using a garden fork or shovel, carefully dig around the base of the plants, being careful not to damage the tubers. Allow the harvested potatoes to cure in a cool, dark place for about two weeks before storing them in a cool, dry location.
In conclusion, planting and caring for a large potato crop can be a rewarding endeavor. By following these effective techniques, you can ensure the success of your potato crop and enjoy a bountiful harvest. Remember to choose the right variety, prepare the soil properly, provide regular care and maintenance, and harvest at the right time. Happy potato growing!
Harvesting and Storing Potatoes: Tips for Preserving Your Bountiful Yield
Planting 1800 Linear Feet of Potatoes
Harvesting and Storing Potatoes: Tips for Preserving Your Bountiful Yield
Potatoes are a versatile and delicious staple in many households. Whether you enjoy them mashed, roasted, or fried, there’s no denying their popularity. If you’re a potato lover and have a large garden, you might be considering planting a significant amount of potatoes. In this article, we’ll explore the process of planting 1800 linear feet of potatoes and provide tips for harvesting and storing your bountiful yield.
To begin, it’s essential to choose the right variety of potatoes for your planting project. There are countless varieties available, each with its unique characteristics. Some popular choices include Russet, Yukon Gold, and Red Pontiac. Consider factors such as taste, texture, and cooking properties when making your selection.
Once you’ve chosen your potato variety, it’s time to prepare the soil. Potatoes thrive in loose, well-draining soil, so it’s crucial to ensure your garden bed meets these requirements. Start by removing any weeds or debris from the area. Then, loosen the soil with a garden fork or tiller, breaking up any clumps and creating a smooth surface.
Next, it’s time to plant your potatoes. Begin by cutting your seed potatoes into smaller pieces, ensuring that each piece has at least one “eye” or bud. This will allow the potato to sprout and grow. Plant the seed potatoes about 12 inches apart and 4 inches deep, with the eyes facing up. This spacing will provide enough room for the plants to grow and develop.
As your potato plants grow, it’s essential to provide them with proper care. Regular watering is crucial, especially during dry spells. Aim to keep the soil consistently moist but not waterlogged. Additionally, consider applying a layer of mulch around the plants to help retain moisture and suppress weed growth.
Once your potato plants have reached maturity, it’s time to harvest them. This typically occurs around 70-90 days after planting, depending on the variety. Start by gently digging around the base of the plants with a garden fork, being careful not to damage the tubers. Lift the plants out of the ground, and you’ll find your potatoes nestled beneath the soil.
After harvesting, it’s important to handle your potatoes with care to ensure their longevity. Start by gently brushing off any excess soil, being careful not to bruise or damage the tubers. Avoid washing them at this stage, as moisture can promote rotting during storage. Instead, allow them to dry in a cool, well-ventilated area for a few hours.
Once your potatoes have dried, it’s time to store them. The ideal storage conditions for potatoes include a cool, dark, and well-ventilated space. A basement or cellar is often an excellent choice. Avoid storing potatoes near fruits or vegetables that produce ethylene gas, as this can cause them to spoil more quickly.
To prevent sprouting, consider storing your potatoes in a burlap or paper bag. These materials allow for proper airflow while protecting the tubers from light. Check your stored potatoes regularly for any signs of spoilage or sprouting, and remove any affected ones to prevent further damage.
In conclusion, planting 1800 linear feet of potatoes can be a rewarding endeavor. By choosing the right variety, preparing the soil, and providing proper care, you can enjoy a bountiful yield of delicious potatoes. Remember to harvest them at the right time, handle them with care, and store them in optimal conditions to preserve their freshness. With these tips in mind, you’ll be well on your way to enjoying homegrown potatoes throughout the year.


